
Please check out the rest of our Global Voices Lingua Guides.
Contents
Subtitling videos for Global Voices
To include subtitles on the videos, we are now using Amara, (no download necessary) to work in a crowd-sourcing environment to create subtitles in different languages for a particular video. There are two main roles in video subtitling:
- a person can transcribe videos from one language into the same language subtitles.
- a person can translate existing subtitles from one language into another.
After reading this guide you'll be able to do both.
Setting up your account on Amara
Go to Amara and click “Sign In” on the top-right corner of the page, or create an account.
Establishing your languages
On the right of the Edit Profile screen (Me → Profile → Edit Profile), you’ll select your notification preferences and select your Language information.
The Preferred Language drop-down is where you select your target language(s). Clicking the add languages button, then Save.
Communication in Amara
Amara provides three main avenues to contact members:
The comment section on the video page.
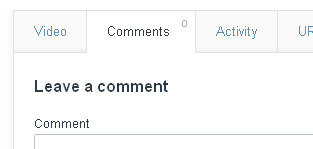
Comments are public: anyone can see them. You can add comments to any videos you see in Amara, whether you are working on them or not.
Best Uses for Comments Section: Add the links for the Global Voices post where a viewer could read more about the video being translated.
Comments are also a great place to show your appreciation for the subtitles and those who worked hard on them, also to comment on the content and get a conversation started about the video itself.
Private Messaging
When you need to communicate directly with another user about subtitling work, this is the option to use if you wish to do so inside the Amara system. No other user will see these messages.
To send a private message you can either go to the user's profile and then click on “Send Message” or go to (Me → Messages → Compose).
Best Uses for Private Messaging: Anything you'd like to ask someone privately: maybe help with proofreading, reaching out to someone with a specific question, to raise an issue or discuss projects.
Subtitling your first video
Creating original subtitles (Transcriptions) and timing
In each step, you will have the option to watch a quick video about how to create subtitles. We recommend watching it!
First off, let’s go over the anatomy of this interface:
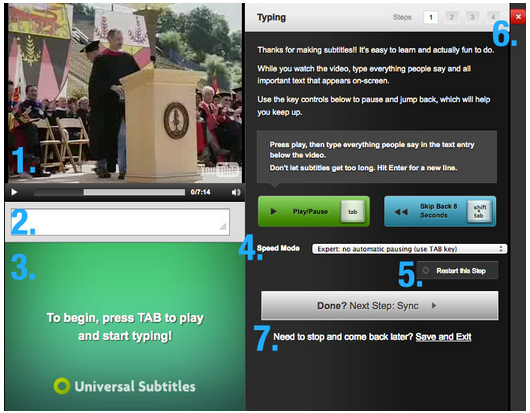
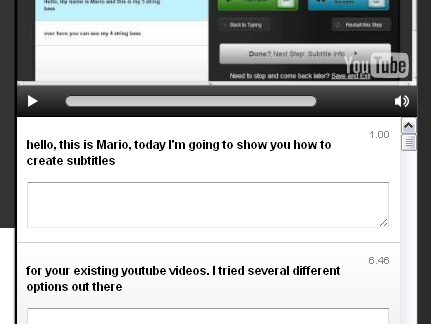
Video Player Located in the top-left of the interface, this will show you the video along with your subtitles overlayed.
Text-Box for entering subtitles Located directly underneath the video player, this is where you enter your subtitles. Hitting “enter” will create a new subtitle line, hitting Shift + Enter will create a second row of text under your existing caption.
Entered Subtitle Lines Your previous translation lines will appear here after hitting “enter.”
Speed Mode This is located on the right-hand side of the interface and is where you can change the speed mode settings. There are three settings that you can choose from:
Beginner: Play 4 seconds at a time, and then pause.
Recommended: magical autopause (just keep typing!): This mode will detect when you begin typing fast, and pause the video for you. It will also begin playing once you’re done typing.
Expert’: no automatic pausing (use TAB key): You are in full control of how often, and when the video begins and stops playing by using the tab key.
The “TAB” button is your friend– regardless of what Speed Mode you are using, hitting “TAB” you will be able to start and stop the video at any time.
The power of “TAB” + “SHIFT”: This will allow you to skip backward 4 seconds in the video at any time in case you missed something!
Restart this Step This button will undo whatever work you’ve done in each step. If you hit this button on the Typing step, it will remove the subtitles you’ve entered. If you hit this button on the Syncing step, it will remove all of the start points for your subtitles, etc.
The Red “X” Clicking on the Red X in the upper-righthand corner give you three options:
Cancel: This will back you back to the Translation interface as though you never clicked “cancel” in the first place. Whew!
Discard: This will clear out the subtitles you had been working on. All of the work you had completed will be deleted. If you were continuing your work from a previous draft– don’t worry, that earlier draft should still be saved as a Revision.
Save and Exit This will save your subtitles, and take you out of the Transcription Interface. If you’re in the middle of doing your subtitling work and need to take a break, make sure to click this link to save your work.
Now that you’ve got a chance to look under the hood, let’s go over the steps to make some subtitles!
Stage 1: Typing
In this stage, you will create subtitle lines.
1. Begin playing the video by pressing your “TAB” key. You can also pause the video by pressing the “TAB” key a second time. Press Shift + Tab together to go back a number of seconds.
2. Type the words exactly as they are spoken in the video and any important text in the video into the Text-box area.
3. Don’t let your subtitles get too long, press Shift + Enter to split the subtitle in two on the screen, or click Enter to start a new subtitle.
Continue steps 1-3 until you have reached the end of the video, and ensured that you’ve typed every single word from the video.
Click the button on the right that says, “Done? Next Step: Sync”
Wipe your brow and give yourself a pat on the back– you’re done with the first step!
Stage 2: Syncing
In this stage, you will sync the start time for each subtitle with the video.
Begin playing the video by pressing your “TAB” key. You can also pause the video by pressing the “TAB” key a second time and skip backward four seconds by pressing SHIFT + TAB.
Tap the DOWN ARROW when the first subtitle should appear, and the UP ARROW when the first subtitle should stop.
Continue this, until every subtitled line has had its start and end times created. If subtitle lines are continuous, you can tap the DOWN ARROW multiple times, instead of hitting the UP arrow unnecessarily.
Don't worry about mistakes here. We can correct them in Step 4: “Check your work.” If you need to start over, click “restart this step” below.
Click the button on the right that says, Done? Next Step: Subtitle Info
Stage 3: Edit Title and Description
In this stage, you will enter the Title of the video, and Description of the video.
In the text boxes to the left, you will find one marked “Title” and “Description” Enter the appropriate Title and Description in each box
When you’re done, click “Done? Next Step: Check your work”
You’re practically a subtitling pro at this point, and you’re almost finished!
Stage 4: Check your work
You will adjust the IN and OUT times for subtitle lines, and make any final edits.
Move your cursor over the edge of a subtitle on the timeline until a hand icon appears, and “<>” symbols appear on each side of the subtitle.
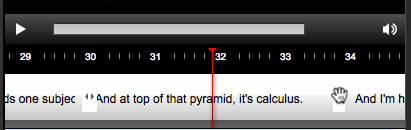
You should be able to click and drag the edges of each subtitle on the timeline so that the timing of each subtitle matches correctly with the video.
You will also be able to edit any subtitles one last time. To do this, click on a subtitle line in the “Entered Subtitle Lines” area of the interface.
If you need to create a new subtitle line, hover over the “Entered Subtitle Lines” area of the interface, and click the green “+” button.
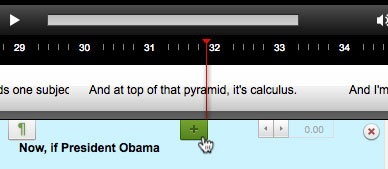
You can navigate forward/backward in the timeline by grabbing and dragging your mouse left/right on the timeline numbers.
When you’ve perfected the IN/OUT timing for each subtitle line, and ensured that the content of your subtitles is accurate, click the, “Done? Submit your work” button.
Your work will now either be published.
Translating Subtitles
When the transcription for a video is finished, you'll be able to translate the subtitles into different languages. Just find an unassigned translation task or create one if necessary and start out on your way.
Translate the subtitles into other languages
Click on Add a new language or select the correct task from the Tasks tab.
The interface is a little bit different from the transcription one, it is simpler!
Below the video player, you'll see the original language subtitles. Underneath each, there's a space for you to add your translation.
Once you are finished, you can click Done? Next Step: Title & Description
Translate the title and description, then go to the Review step, double-check your translation and you'll be finished!
If at any time during your translation you need to stop and go, click on Save and Exit.
Check someone else's work
If you don't find any available tasks in your language, you can still help us out! We always need an extra pair of eyes to go over existing subtitles.
Click on a video, and then click on the language name on the sidebar, and then click on “Improve These Subtitles”. That will take you to that specific language subtitle for that video.
On the language page, to the left is a small video player and to the right, you'll see a transcript of the video. Read through the transcript and if you see anything out of place or incorrect, click on “Edit Subtitles” to make the change.
Embedding Amara Videos
When using an Amara-translated video in a Global Voices post you should never use the embed code provided by Amara. It is unstable in the WordPress editor and likely to break when the post is translated.
For instructions on embedding a video with Amara subtitles on GV, please see also the “Amara Subtitles” section of the GV Posting Guide, which has detailed instructions and considerations to keep in mind.
Tips and Tricks
If you have tips, hacks, or advice on how to perform certain tasks on Amara or work the subtitling process, please add them to the comments section below.
1 comment